This hop will show you some of the new things that Close to My Heart has to offer in the 2012 Fall/Winter Idea Book.  If you are starting here or coming from Vicki Price’s Blog, you are on the right path.
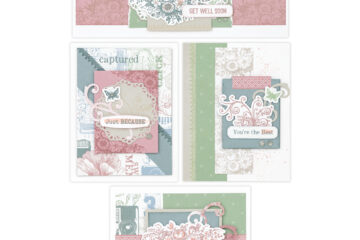
I decided to complete one of the Workshop on the Go Kits for you.  This is one of the new ones this fall that focuses on cards!  With this workshop, you are given directions and supplies (including cards and envelopes) to complete 15 cards (5 each of 3 designs as shown above).  This set of cards was pretty easy to complete.  The time CTMH gives for this is about 3 hours.  It only took me 2 hours from start to finish but I was focused and this was uninterrupted nap time.  I would be careful when cutting your papers, double check before you cut just to make sure so you have enough.  I was trying to be careful with the ribbon but there was plenty of ribbon and bubbles so you don’t have to worry when you are working with these.  I’d still measure but don’t be afraid to give yourself some extra if you need it for tying.


Supplies used are all Close to My Heart: Avonlea Workshop on the Go Cardmaking Kit, Chocolate Ink, Slate Ink, Smokey Plum Ink, 3D Foam Tape.
Another tip I would like to share with you is how I put together the last card.  I first knotted the ribbon, then with the card laid out (but not attached) I used a glue dot to attach the ribbon to the patterned paper.  I positioned the glue dot in the spot where the bubble would go (thus hiding the glue dot).  Next, I cut the ribbon leaving a little extra on the end to wrap around.  I added adhesive to the back of the patterned paper, folded the ribbon over so the end would be hidden, and attached this piece to the card.  After attaching the other pieces, I added another glue dot (which I rolled up to make it smaller) to the knot end of the ribbon so it was attached on that end.  This seemed to work well to hide the ends of the ribbon.  I prefer this over just cutting them in case it frays.  This is my favorite paper from this idea book and it was a lot of fun to work with.  It will work for so many different occasional cards and layouts.
I used up the scraps in this kit to make these additional 5 cards below.  I added 3 card bases.  My paper is pretty much gone but I have a full sheet of bubbles and a bunch of ribbon left over to use for future projects.  Update: There was an error (that has now been corrected) in the amount of ribbon included with this kit, therefore you will have enough to complete the original cards but you will not have all the extra that I had.


Now hop on over to my friend Shirley Ross’s Blog to see what she has to show you!
Scroll down to the previous post for a list of participants with direct links to their posts.

4 Comments
Dawn · 08/05/2012 at 9:04 pm
Your cards turned out perfectly!
Lori Miller · 08/05/2012 at 9:40 pm
Lovely cards! Thanks for showing what can be done with what is left over – great work!
Wendy Coffman · 08/06/2012 at 6:26 pm
So elegant! Thanks for sharing!
Deanne J · 08/08/2012 at 6:32 pm
Love these cards