Welcome to the first Close to My Heart Product Spotlight Blog Hop! Each month we will spotlight a different CTMH product. This month we are featuring Imagine – one Close to My Heart’s three how-to programs. Imagine contains 50 two-page 12×12 patterns, with complete cutting diagrams and detailed assembly instructions. With full-color artwork and plenty of clever techniques this is a great book for both beginners and experts. You can flip and rotate the patterns for endless combinations! You can use the patterns exactly as they are laid out for a no-brainer layout or you can use them as a guide and add your own creativity. Photos and jouraling areas can be interchanged, you can add different size photos, you can leave photo areas blank or replace with embellishments. Personally, I do a combination of these depending on my photos and my mood. One thing is for sure – I always end up with a layout I am pleased with in the end.

Products used are all CTMH unless otherwise noted:
Stardust Level 2 Paper Packet
Starstruck stamp set
Circle Around stamp set
Field Trip Alphabet stamp set
White Daisy Grosgrain Ribbon
Hemp
White Daisy cardstock
Moonstruck & Honey Ink
buttons (other, unknown)
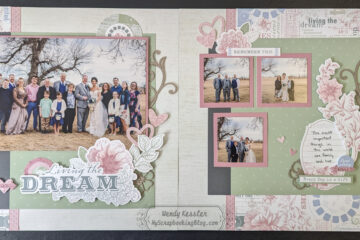
For my layout I used the “Introduction” pattern. You can see that the CTMH papers have a white core. If you want the white to show – pull the paper towards you when you tear. If you don’t want the white to show, then pull the paper away from you when you tear.
I used a variety of stamping techniques for the stars. All are stamped on White Daisy cardstock. The dark blue ones are stamped with Moonstruck ink, then sponged on the edges with Honey. For the one with the white edges I used the rock and roll technique. I inked the stamp with Honey, then “rolled” the edges on the Moonstruck ink pad, then stamped. For the final star that looks yellow/green, I first inked in Honey, then used a sponge dauber (BTW, I love these things!) to add Moonstruck ink around the outside, then stamped. The colors mixed together creating a green. For the arrow, I used a 2-step stamping technique. I stamped the solid arrow with Honey, then stamped the dotted arrow around it with Moonstruck. I just love how easy this is to do with acrylic stamps because you can see exactly where you are stamping!
This is layout #13 of 210.
I hope you enjoy the hop and be sure to come back next month, on February 15, when we will be featuring the stamp set You Rock.
Now hop on over to KRISTI’S BLOG and check out her layout!
For a complete list of participants, or if you get lost along the way, you can go here.


7 Comments
Barbara Harris · 01/15/2010 at 7:28 am
Perfect paper pack for this group of pictures! Gorgeous! So energizing. 😉
Cindy · 01/15/2010 at 8:03 am
What a fun layout! Perfect for the theme!
Carol · 01/15/2010 at 8:12 am
I love these papers and layout!!!! Awesome!!!!!!!
Tracy · 01/15/2010 at 10:07 am
Fun layout Wendy! Nice job.
Jenifer Benner · 01/15/2010 at 10:48 am
Love it!! I love those stardust pp. They’re great for boys! (have 3 boys )
Haley D. · 01/15/2010 at 5:29 pm
How fun! Thanks for sharing the great technique info.
GoofyScrapper · 01/16/2010 at 12:07 pm
Fun pages!